


I think we can all agree that Google has evolved a lot in the last few years… The two biggest changes in my opinion have been the arrival of BERT with the uses of entities (topics) instead of queries (keywords), and the implementation of E-A-T for determining the expertise of the authors on the web.
For many, E-A-T (now E-E-A-T) is just a manual process rarely used by Google to determine real expertise on the biggest YMYL sites… But if you are doing a lot of testing, you will see that Google is now crawling websites for E-E-A-T footprints and rewards websites for having a good E-E-A-T score.
There is no way to know your E-E-A-T score as it’s something hidden from the public, like your PageRank score… But there is a good way to improve it, and it’s through the use of schemas and entities. In the precedent months, I did a lot of tests, and finally ended to build the perfect author profile for a great E-E-A-T score! It’s your lucky day today as I’m gonna tell you how you can boost E-E-A-T for your authors, and all for free 🙂
Still having doubt that E-E-A-T is a real thing? Read below!
Google said; < using a mix of factors that can identify content with good E-E-A-T is useful. >

When Google says something is “useful”, it means it’s a ranking factor, even if said otherwise.
If you want some data to back my says, below is the result on one of my starter sites after having implemented E-E-A-T.

A nice increase for something that is not a ranking factor, isn’t it? 😉 As you see, E-E-A-T implementation also helps to improve ranking on sites, even if they are not YMYL topics. Also, to be honest, even if you don’t do it for the ranking, you should do it for the long-term viability of your websites. With the emergence of AI content, the importance of the author’s expertise will become more and more important!
Okay now that I got your attention, let me explain to you in my words, what I believe E-E-A-T stands for.
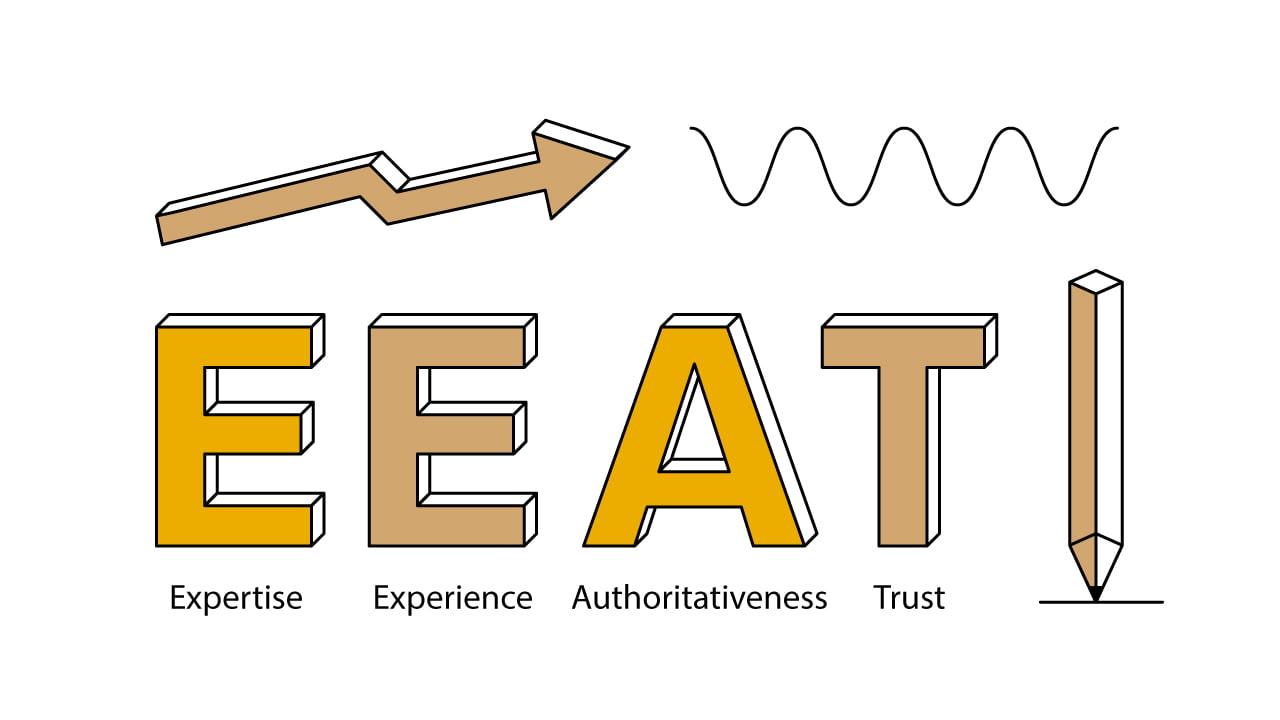
What is E-E-A-T
It’s not a secret (except if you are living under a rock), E-E-A-T stands for:
- E: Expertise
- E: Experience
- A: Authoritativeness
- T: Trust
But everyone knows what E-E-A-T means… But how many of you know how you can leverage it? Mostly don’t. Below, I will explain to you in my words what all letters mean and tell you what you can do to boost each part of E-E-A-T.
1. “E” for Expertise
For me, the “E” of expertise is the demonstration of the knowledge established by your authors. To demonstrate the expertise of your authors, here are a few things you can do:
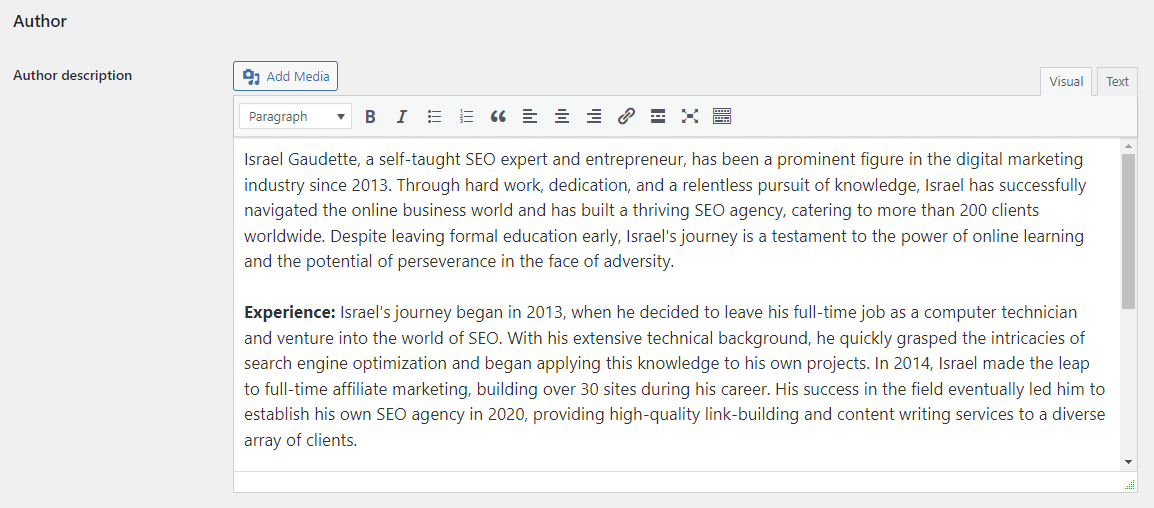
- Author pages with bio
This is important that all your authors have their author bio indexable and completed. A good author bio should always include an introduction of the author, and the following sections: Experience, Expertise, and Education. This data will also be later, integrated into your schema. You can see a good author bio example here. - Author schema
The data in your “Person” schema must reflect the data from the author’s bio. We will come back to this later in this article. - Online presence
When we search the name of your author on the web, we should be able to find multiple mentions across the web, like social media profiles or collaborations (mention on other sites on the same topics that you are an expert on).
A good and easy strategy to leverage your author’s authority on a specific topic is to create a book on the topic, and then publish it on Kindle/Google Books. Then, add the link to this book in your “sameAs” schema and author bio, to create an association and show Google you are the author of that book. - Social profiles
Having a social presence is important for your authors because most real authors have it. To show Google you are a real person, you should definitely have a social presence (and ideally, be active). Make sure to mention your expertise (topics) in your social profiles.
For example, if you are an expert in SEO, you should definitely have “Search Engine Optimization” listed in your author bio, in the Expertise section. You should also have this added to your social profile, like “Search Engine Optimization Expert” or “SEO Expert”.
Make sure to link to all your social profiles from your author bio, and add them to your “sameAs” schema.
Basically, the “E” for Expertise are footprints to show Google you are a real person and have knowledge on the topics you are writing on.
2. “E” for Experience
The “E” for Experience is your “topical authority” score. The more articles you published under your author’s name, for a specific topic, the more experience you have.
In addition to having a good amount of articles on a specific topic, you should also mention these topics in your “Experience” section, on your author bio. These areas (topics) of expertise should be in your “knowsAbout” attribute, under the person schema of your author.
3. “A” for Authoritativeness
This one confuses a lot of people… because most of you think it’s related to “domain authority” but that’s not the case. This is for content authority.
How in-depth the content is written? Does the author covered the entire topic in his article? Does all ranking queries for this topic are from articles written by the same author?
For me, this is definitely for content authority. A good way to build up your author’s authority is to write more articles on the topic you want him to gain authority on.
4. “T” for Trust
The latest letter of E-E-A-T means Trust. This one is not toward the author but the organization. Is the organization behind the site legit? Is it a real company? Who is managing the site? Who are the employees? All these things are for the Trust factor. Here are below the important footprints you should have on your site to have a good Trust score.
- Multiple emails for department general.inquiry@, media.inquiries@, support@ (Shown on the contact page and footer). Never only show a contact form.
- Address and phone number (Phone really important, must match local address). Show on the contact page and copyright/footer.
- About page (About company + team section)
- Copyright with the symbol and up-to-date date.
- Privacy policy page
- Cookie / GDPR notice
- HTML sitemap (Improve crawl depth and solve orphan pages)
- Healthy site (Show that someone cares about the website)
You have to show Google that the business is real. In addition to all the elements above, this will be also important to include the legal information in your Organization schema (more on this later).
Okay great! Now that you have a good overview of what E-E-A-T is and how you can improve it, let’s move to the technical part; the implementation!
How to Implement E-E-A-T (Step by Step)
Step 1: Enable Author Archives
Make sure your author pages are indexable. If you are using Rankmath, go here: Rankmath → Titles & Meta → Authors and enable the Author Archives.
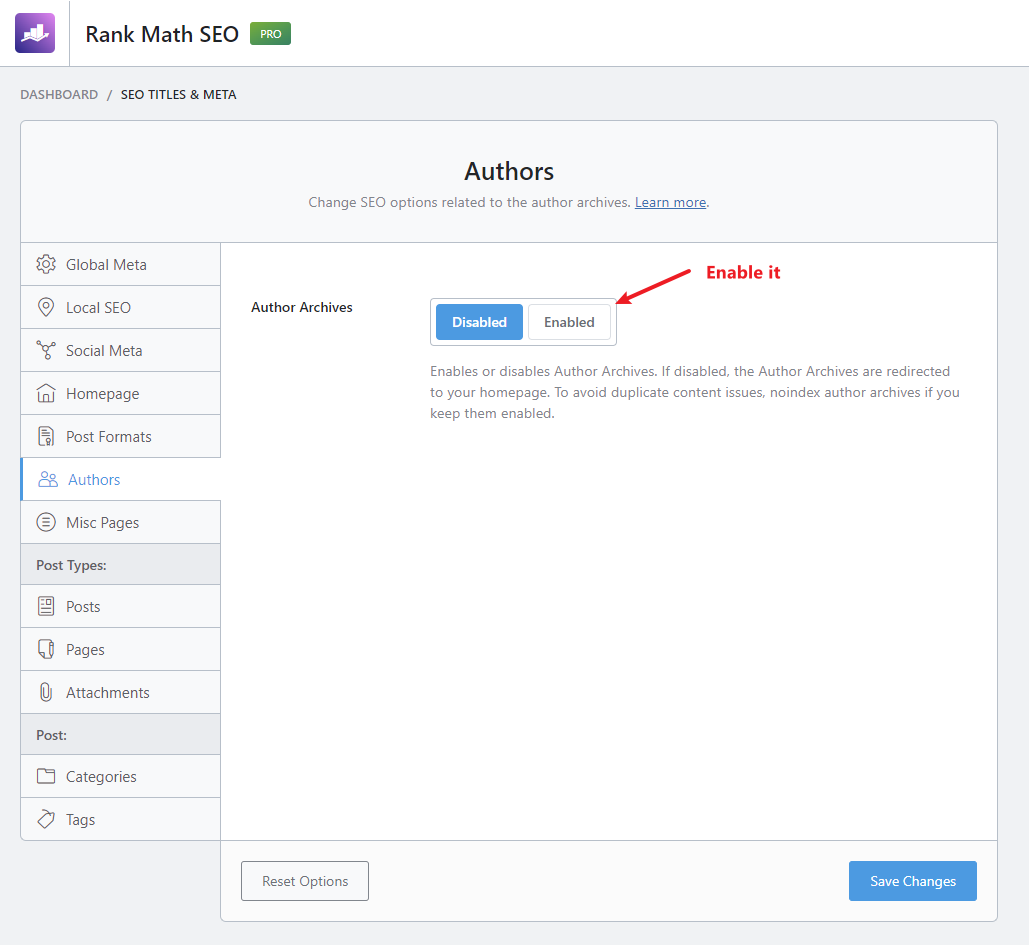
Once enabled, make sure the author archive is indexable.

Once your author archive is enabled, it’s time to create the custom fields that will serve to inject important E-E-A-T attributes into your schema and author profile.
Step 2: Create Custom Fields
For this, you will need to install the ACF plugin, the free version is enough. Once installed, in your WordPress backend, go to ACF → Tools.

And then import this JSON file.

Once imported, go to ACF → Field Groups, you should see a new group called “Author”.
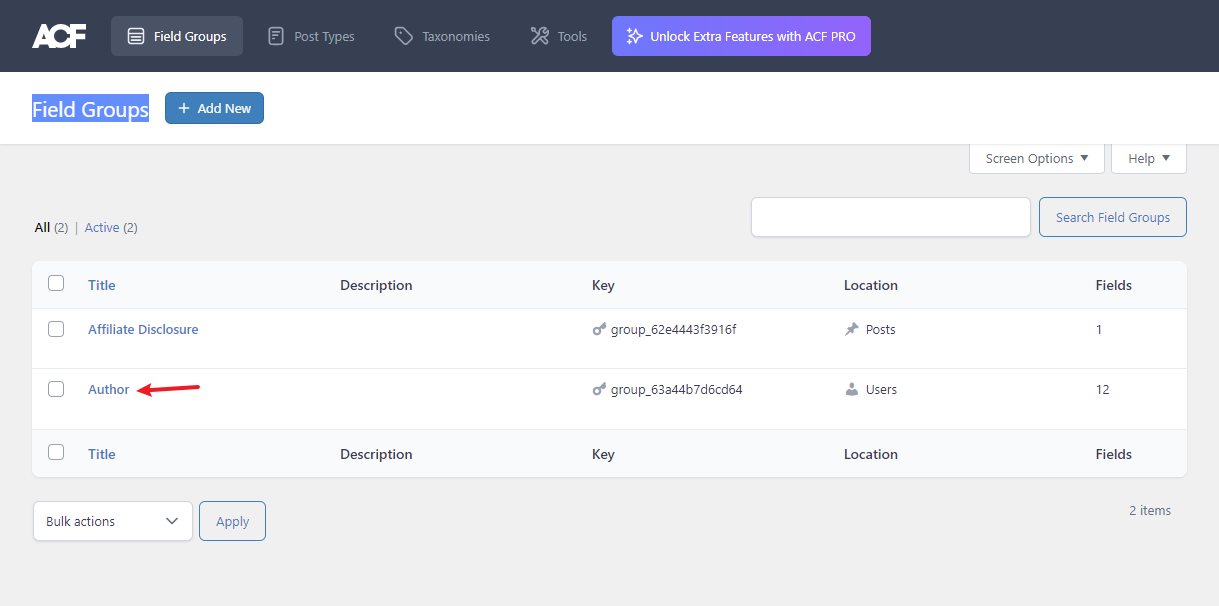
Click on it and make sure you see the following fields.
If you have them all, great! Move to the next step!
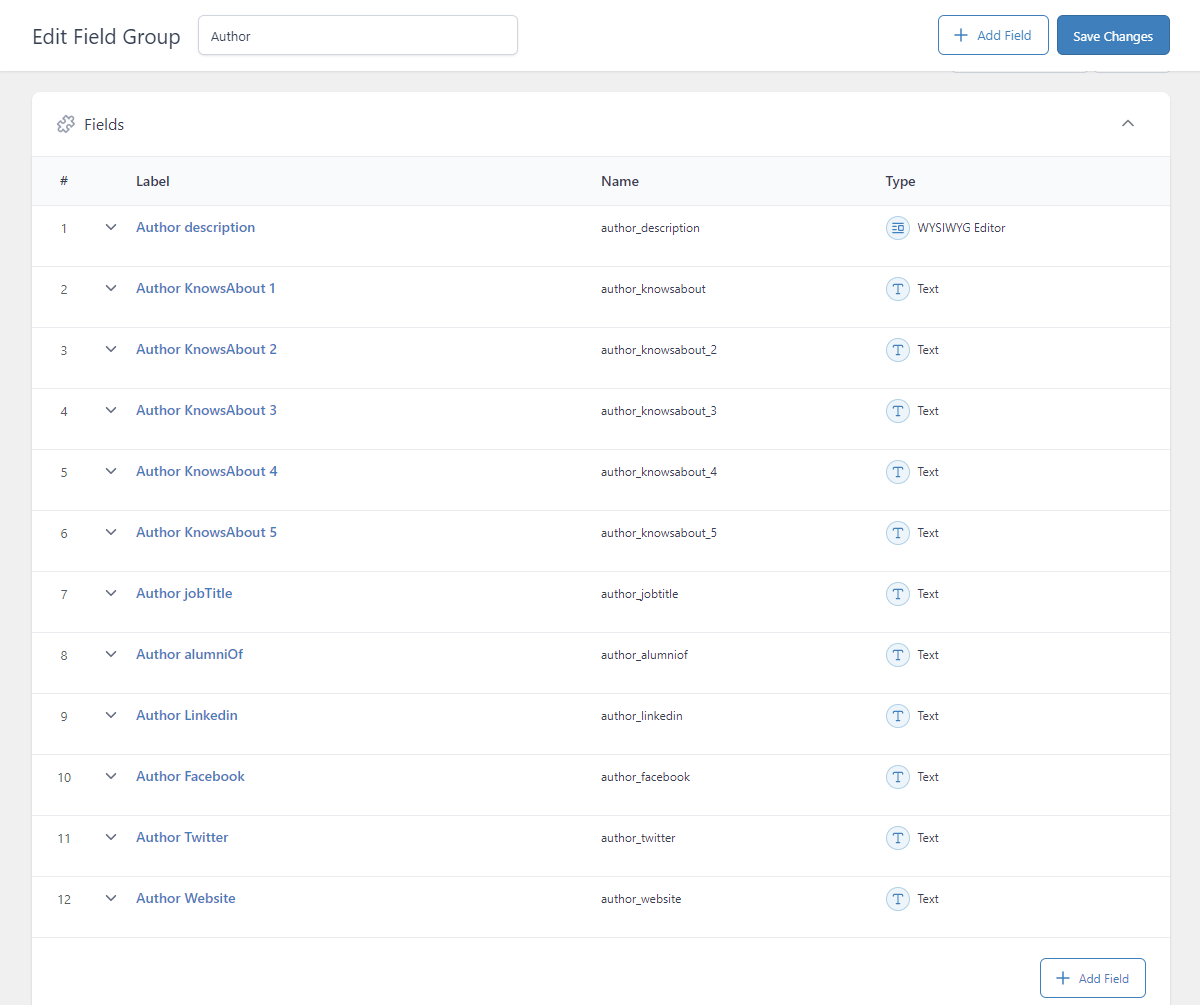
Step 3: Edit User Details
Now that you have imported the custom fields, you should see them in your user details. Go to Users → All Users and click to edit your author. You should at the end all the new custom fields:
Now that you have all the fields added, it’s time to fill them with valuable information for your author. Let me explain quickly.
The fields “KnowsAbout” are for topics (entities). If you have read my guide on entities, you know that the post categories on your site should use topics recognized by Google (entities). So since I’m the only author on my website and I’ve written articles on all my website topics, I will add the following value to my knowsAbout fields;
Affiliate Marketing https://en.wikipedia.org/wiki/Affiliate_marketing
Search Engine Optimization https://en.wikipedia.org/wiki/Search_engine_optimization
Link Building https://en.wikipedia.org/wiki/Link_building
But keep in mind you are not limited here to your topic categories, you can add up to 5, so in my case, because I have a good experience in Semantic publishing and I’ve written multiple articles on the topic, I will add it as well.
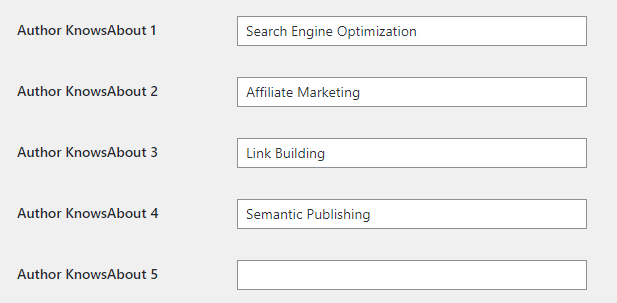
Note: Remember, all the value added in your field here must absolutely have its own Wikipedia page. This is also been the case for Semantic Publishing. I also recommend focusing your author on a small set of topics that are all relevant to each other. A common mistake that a lot of people are doing is to use the same author for big sites, that cover different and unrelated topics.
If you have a site in tech and finance.. One author should be allocated to only tech-related content, while another for finance content. Do not dilute the authority of your authors with irrelevant topics. Make your author an expert on a specific topic, and stick with this topic! Add new authors for different topics.
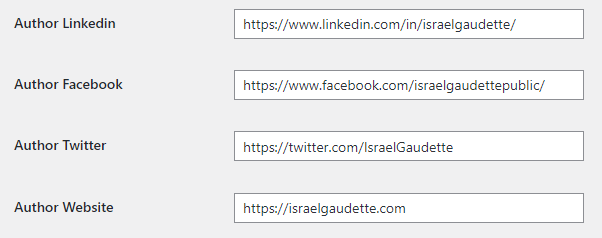
Now, for the social media, I don’t have anything to add here, just add the social media profiles of your author. Also, add the author’s website if he has any.
Don’t forget to set your social media in your SEO plugin as well (Rankmath in my case).

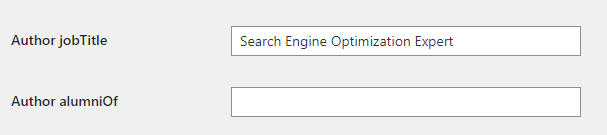
For the jobTitle, you have to fill your career (must match with your expertise → knowsAbout). In my case, I will write Search Engine Optimization Expert.
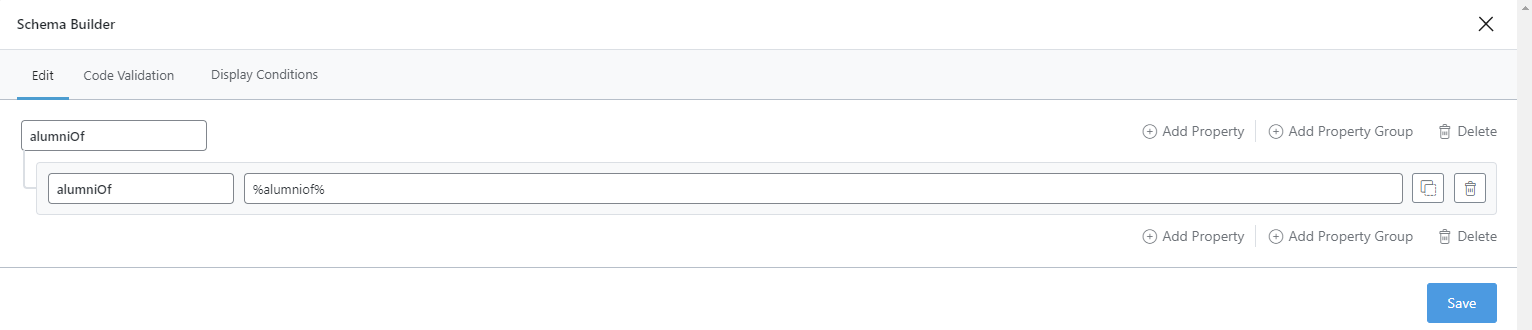
The alumniOf is the field for your education, where you studied, and where you got a certification. So if you have studied at the University of Chicago, you should write this here. In my case, because I didn’t educate myself at school, I left it empty.
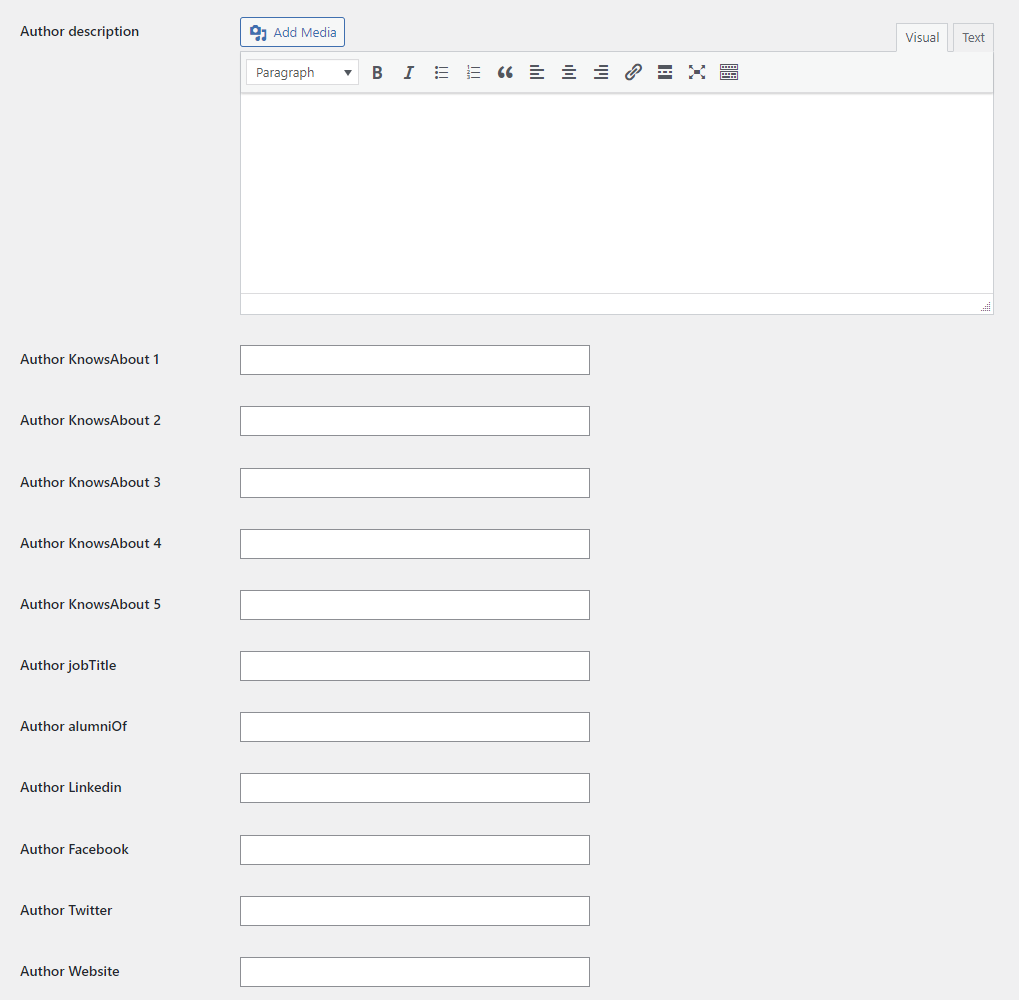
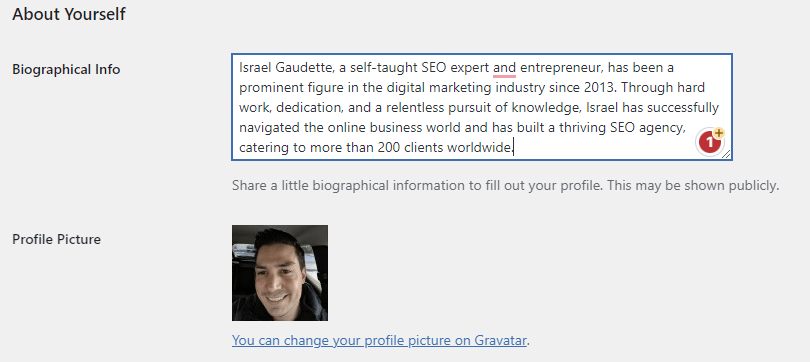
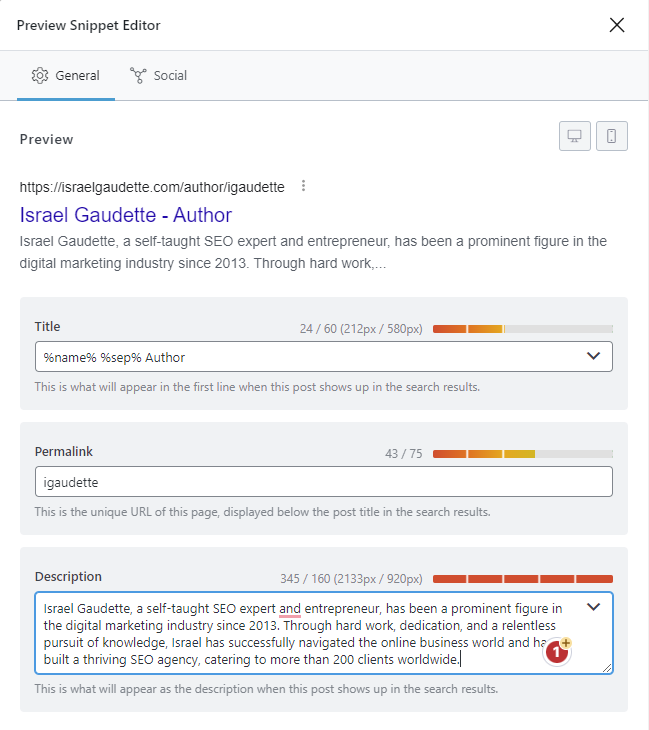
And finally, you have to write your bio, a short and long version.
In the new description field, add your long biography. This is the one that will be added to your author page.
And the short version in the default WordPress description field, and Rankmath author description.
Now you’re done editing the author info. Depending on your theme, you may have to create a custom template for the author archive. Modern themes like GeneratePress have this feature.
You can create a new template, and use the dynamic options to show custom attributes like the author name, author avatar, author description (using the ACF metadata), and finally, the list of all articles written by the author. I won’t go in deep here as there is already plenty of tutorials online about WordPress customization.
Once done, this should look like this: https://israelgaudette.com/author/igaudette/. Okay now the author editing part is completed but we are not done yet! We still have to inject the schema attributes across all the website pages. Here we go…
Step 4: Inject Schema Sitewide
For this step, you will absolutely need Rankmath Pro (or any other advanced schema plugin). Rankmath Pro is just 59$/year for unlimited websites, believe me, it’s 100% worth it!
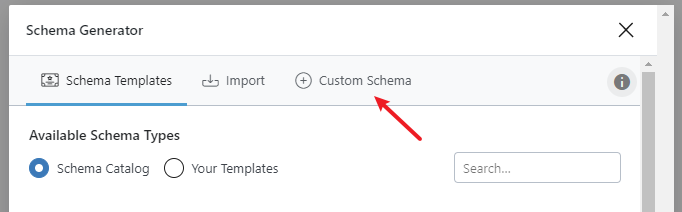
Once Rankmath Pro is enabled on your site, go to Rankmath → Schema Templates.
Create a new schema template and go directly to the “Custom schema” section.
We will need to create 5 schema templates; knowsAbout, jobTitle, alumniOf, Publisher and Copyright.
Note: Attention, you have to use exactly the same value as shown below. If I write “knowsAbout” it should be like that, not “knowsabout”. And so on. Let’s start.
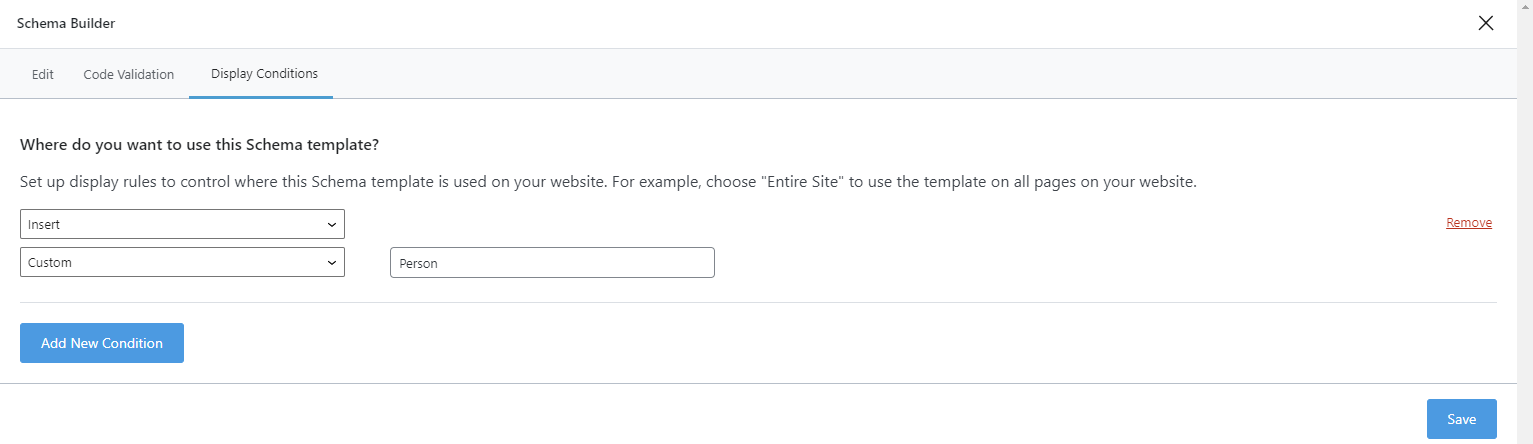
Note: Make sure to apply the correct display condition for each schema.
knowsAbout (Nested structure as we have multiple entries)

jobTitle

Okay now we are done with the schema for the author, we need to move to the schema for Organization. We need to show that we are a real business. Those will have different display conditions so make sure to inject them into the correct location. The display location is added below each image.
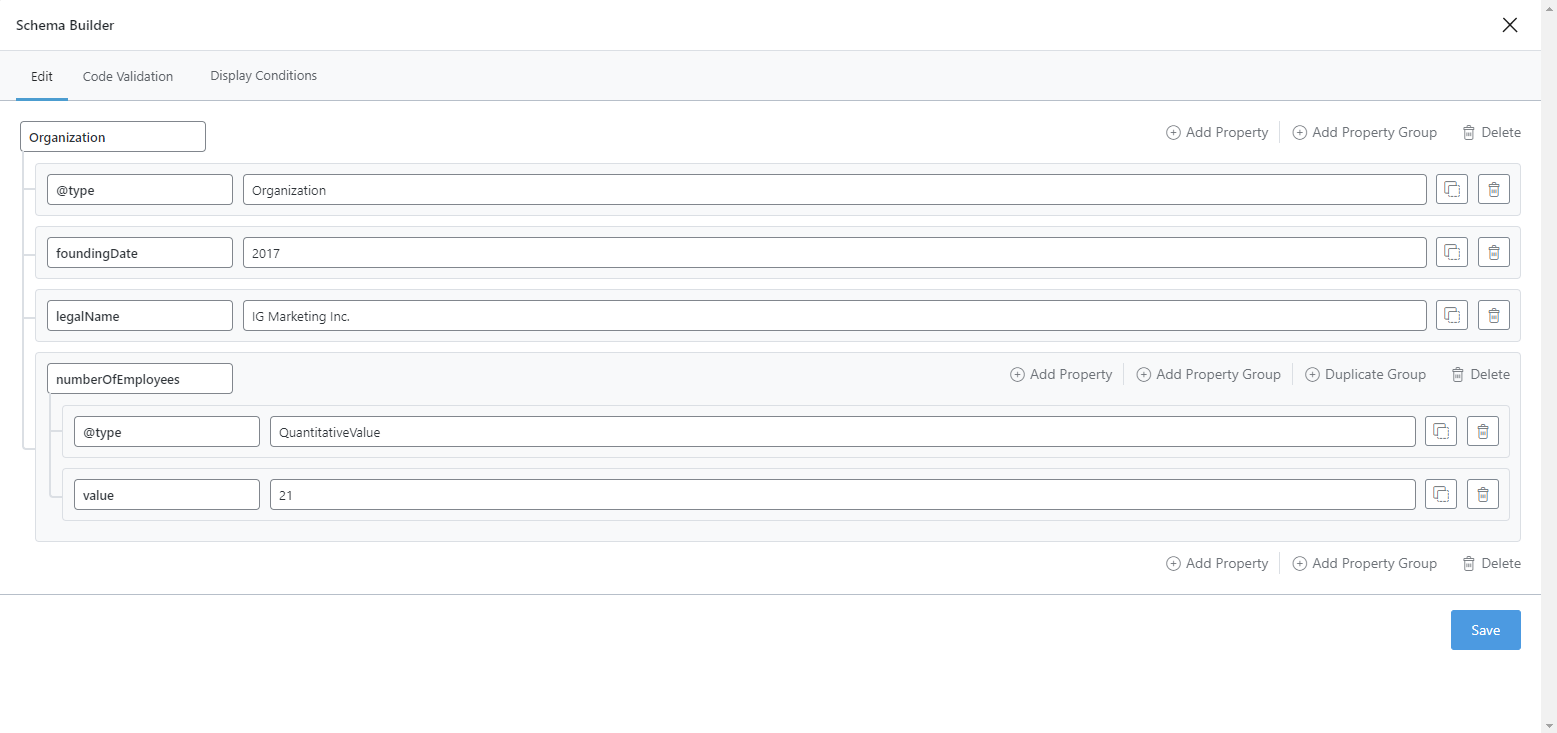
Publisher
For this one, you will have to set custom values, for foundingDate, legalName and numberOfEmployees. The value must reflect your legal business.
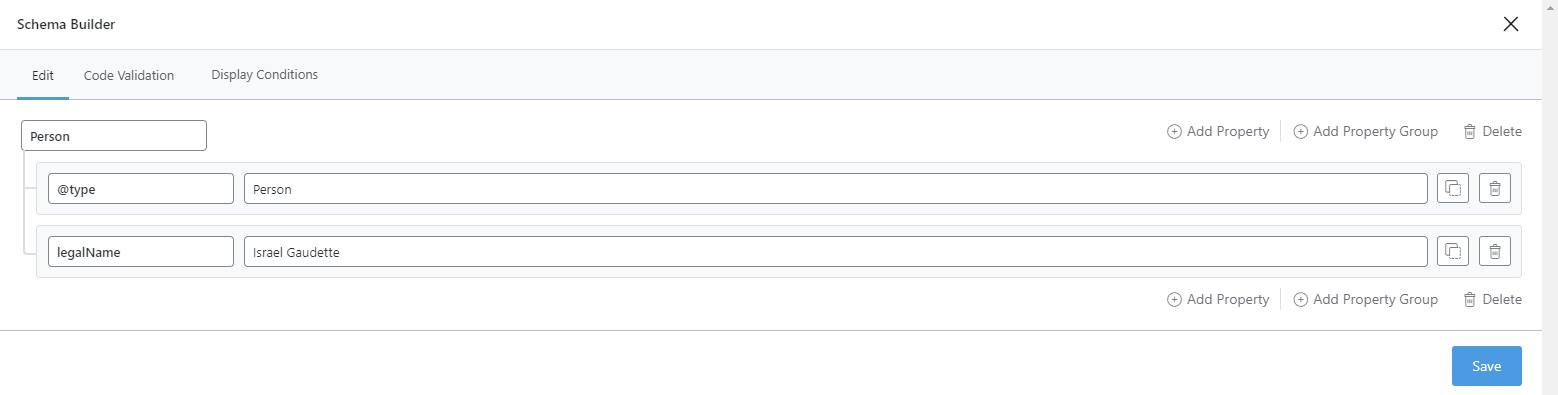
If your website represents a Person, instead of an Entity, you will have to change @type for “Person” and remove foundingDate, numberofemployees. Like below:
Copyright
For this one, you will also have to set custom values, for id, name, URL, foundingDate, and legalName.
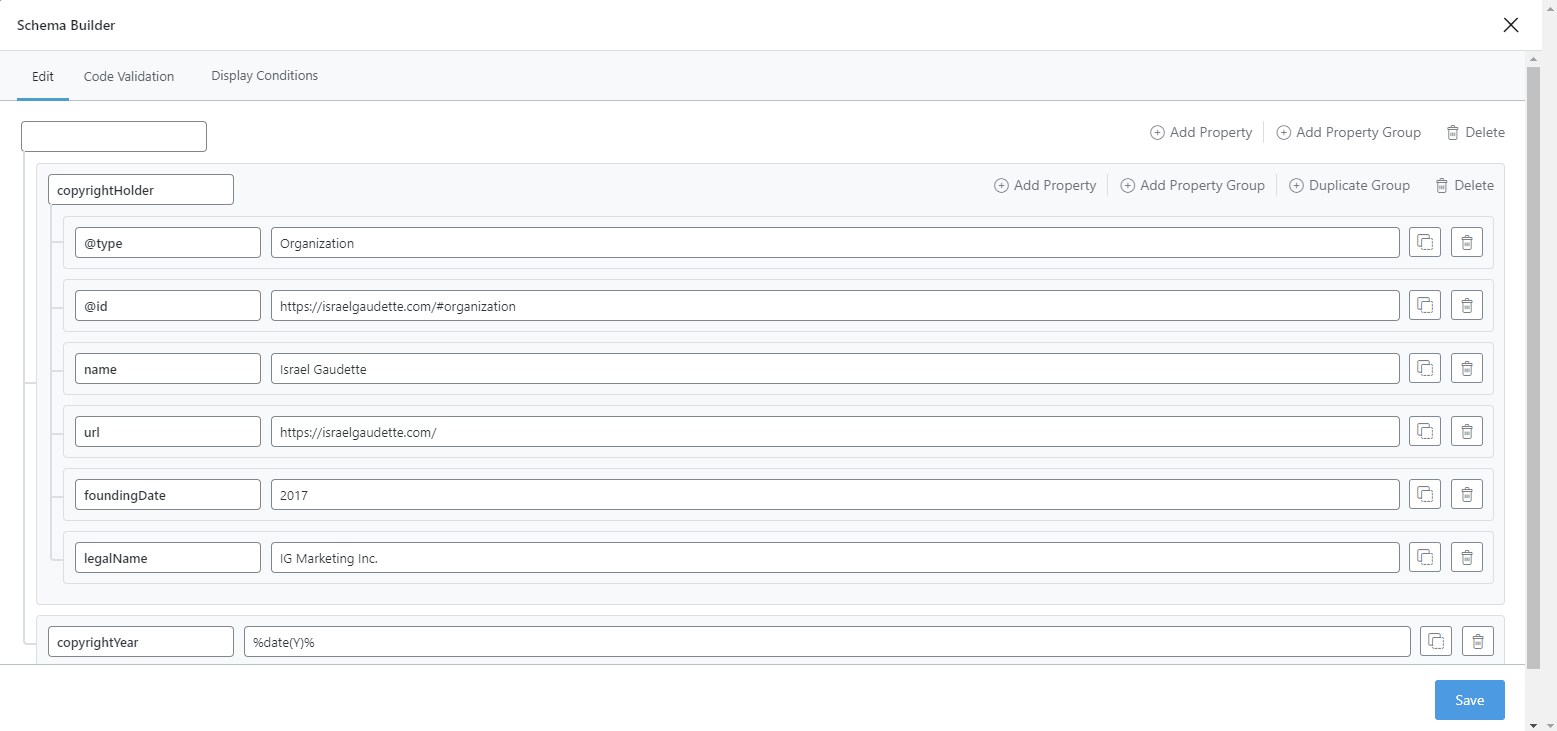
The URL to add in the id field is usually your website URL followed by #organization but if you want to make sure, check your homepage with a schema validator. If in my case, you have set your site as a Person and not an Organization in your SEO plugin, it will be #person. In my case, because it’s my personal blog, I have #person.

Perfect! We are done with the schema part! Now let’s move to register the custom variables.
Step 5: Create Custom WordPress Variables
To be able to inject our custom ACF fields in our schema, we need to convert the ACF metadata into WordPress variables. You are lucky because I have already spent numeral hours to get this working (It wasn’t easy!).
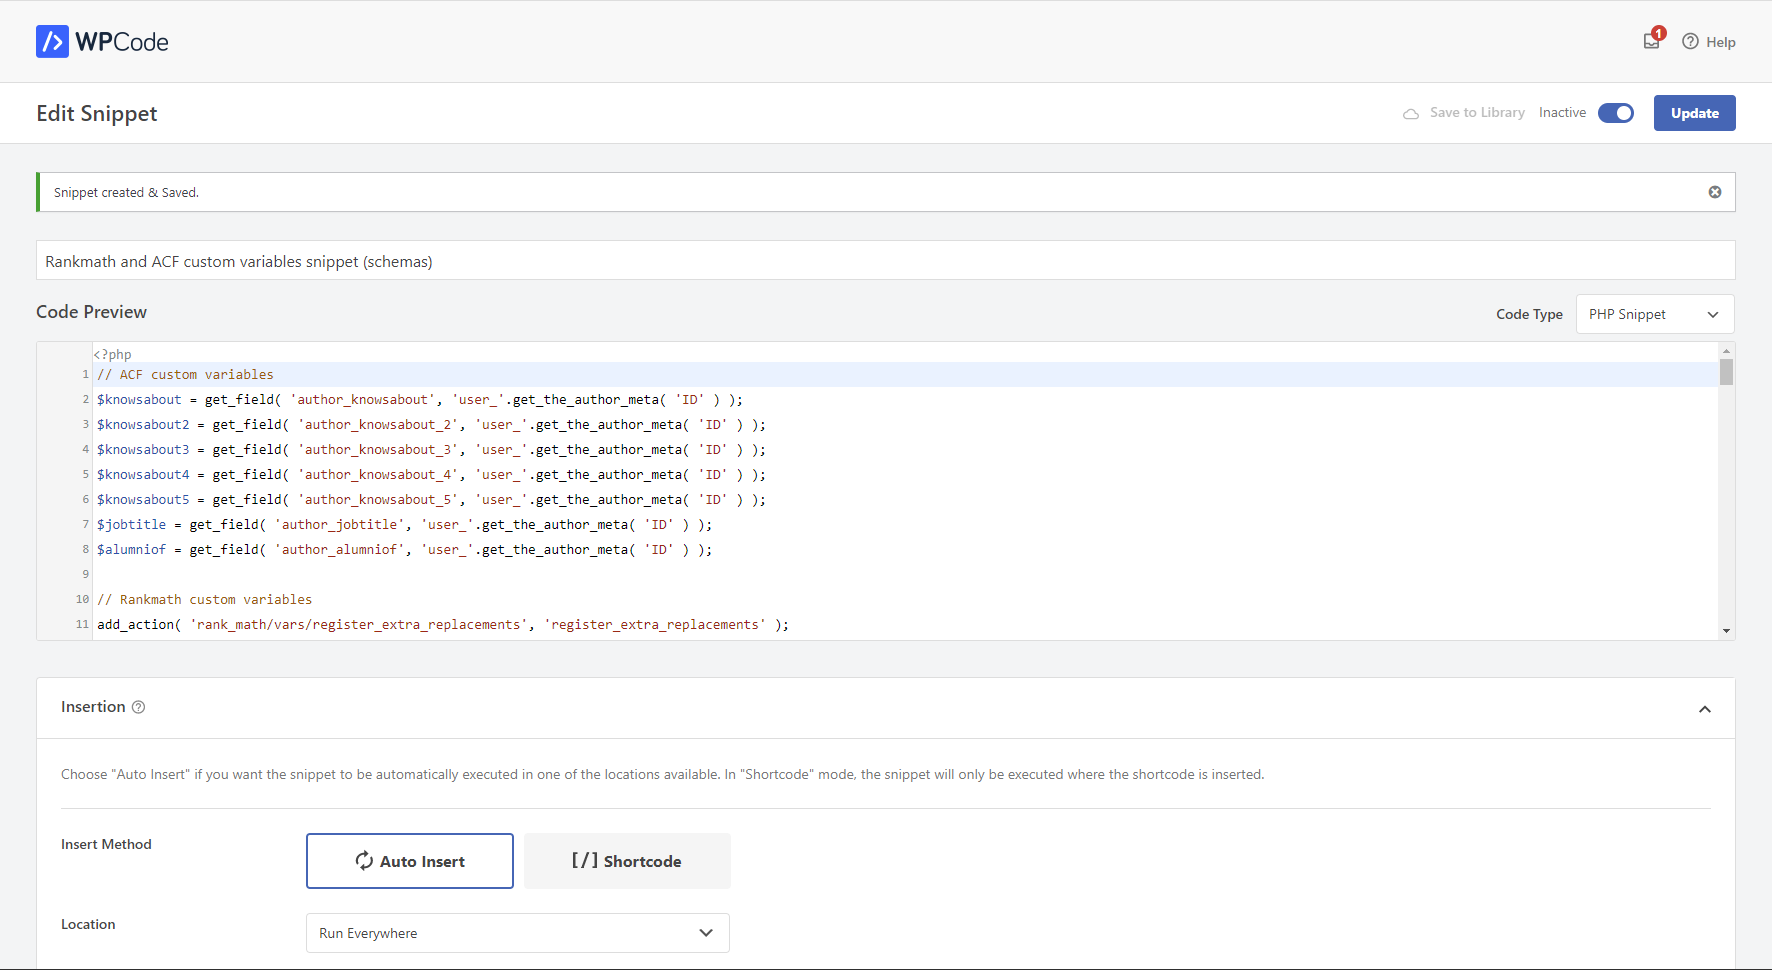
For this, you will need a code snippet plugin, I highly recommend the WP Code Snippet plugin. Once the plugin is installed, create a new snippet, select “PHP” and paste the code below:
// ACF custom variables
$knowsabout = get_field( 'author_knowsabout', 'user_'.get_the_author_meta( 'ID' ) );

$knowsabout2 = get_field( 'author_knowsabout_2', 'user_'.get_the_author_meta( 'ID' ) );

$knowsabout3 = get_field( 'author_knowsabout_3', 'user_'.get_the_author_meta( 'ID' ) );

$knowsabout4 = get_field( 'author_knowsabout_4', 'user_'.get_the_author_meta( 'ID' ) );

$knowsabout5 = get_field( 'author_knowsabout_5', 'user_'.get_the_author_meta( 'ID' ) );

$jobtitle = get_field( 'author_jobtitle', 'user_'.get_the_author_meta( 'ID' ) );

$alumniof = get_field( 'author_alumniof', 'user_'.get_the_author_meta( 'ID' ) );

// Rankmath custom variables

add_action( 'rank_math/vars/register_extra_replacements', 'register_extra_replacements' );

function register_extra_replacements() {

global $knowsabout;

rank_math_register_var_replacement(

'knowsabout',

array(

'name'        => esc_html__('Knows About', 'rank-math'),

'description' => esc_html__('Author Knows About', 'rank-math'),

'variable'    => 'knowsabout',

'example'     => 'knowsabout_callback()',

),

'knowsabout_callback'

);

global $knowsabout2;

rank_math_register_var_replacement(

'knowsabout2',

array(

'name'        => esc_html__('Knows About 2', 'rank-math'),

'description' => esc_html__('Author Knows About 2', 'rank-math'),

'variable'    => 'knowsabout2',

'example'     => 'knowsabout2_callback()',

),

'knowsabout2_callback'

);

global $knowsabout3;

rank_math_register_var_replacement(

'knowsabout3',

array(

'name'        => esc_html__('Knows About 3', 'rank-math'),

'description' => esc_html__('Author Knows About 3', 'rank-math'),

'variable'    => 'knowsabout3',

'example'     => 'knowsabout3_callback()',

),

'knowsabout3_callback'

);

global $knowsabout4;

rank_math_register_var_replacement(

'knowsabout4',

array(

'name'        => esc_html__('Knows About 4', 'rank-math'),

'description' => esc_html__('Author Knows About 4', 'rank-math'),

'variable'    => 'knowsabout4',

'example'     => 'knowsabout4_callback()',

),

'knowsabout4_callback'

);

global $knowsabout5;

rank_math_register_var_replacement(

'knowsabout5',

array(

'name'        => esc_html__('Knows About 5', 'rank-math'),

'description' => esc_html__('Author Knows About 5', 'rank-math'),

'variable'    => 'knowsabout5',

'example'     => 'knowsabout5_callback()',

),

'knowsabout5_callback'

);

global $jobtitle;

rank_math_register_var_replacement(

'jobtitle',

array(

'name'        => esc_html__('Job title', 'rank-math'),

'description' => esc_html__('Author Job title', 'rank-math'),

'variable'    => 'jobtitle',

'example'     => 'jobtitle_callback()',

),

'jobtitle_callback'

);

global $alumniof;

rank_math_register_var_replacement(

'alumniof',

array(

'name'        => esc_html__('Alumni Of', 'rank-math'),

'description' => esc_html__('Author Alumni Of', 'rank-math'),

'variable'    => 'alumniof',

'example'     => 'alumniof_callback()',

),

'alumniof_callback'

);

}

function knowsabout_callback() {

return get_field( 'author_knowsabout', 'user_'.get_the_author_meta( 'ID' ) );

}

function knowsabout2_callback() {

return get_field( 'author_knowsabout_2', 'user_'.get_the_author_meta( 'ID' ) );

}

function knowsabout3_callback() {

return get_field( 'author_knowsabout_3', 'user_'.get_the_author_meta( 'ID' ) );

}

function knowsabout4_callback() {

return get_field( 'author_knowsabout_4', 'user_'.get_the_author_meta( 'ID' ) );

}

function knowsabout5_callback() {

return get_field( 'author_knowsabout_5', 'user_'.get_the_author_meta( 'ID' ) );

}

function jobtitle_callback() {

return get_field( 'author_jobtitle', 'user_'.get_the_author_meta( 'ID' ) );

}

function alumniof_callback() {

return get_field( 'author_alumniof', 'user_'.get_the_author_meta( 'ID' ) );

}

?>
And set the following parameters:
Condition: Run everywhere
Priority: 1
Now you can check the final results in schema here. Move to the Article section and you’ll be able to see all the information regarding myself… Just click on the “Article” schema and you’ll see all the info 🙂
Conclusion
Congratulation! You just boosted your E-E-A-T score for all your authors 🙂 Now Google knows exactly which area of expertise your authors know about and know now that your website is managed by a real and legit business!
Some important rules that are important to not forget to boost further your E-E-A-T score for your authors.
- Always link to the author in your articles. The author’s name must be clickable and link to the author’s bio page.
- Try to assign your author to a set of topics that are relevant to each other to boost your area of expertise. Avoid “topic dilution” in attributing content to your author that he is not an expert in.
- Always think with entities in mind. Structure your site using well-recognized entities (topics).
- To boost content relevance, apply Semantic Publishing (check my guide on entities)
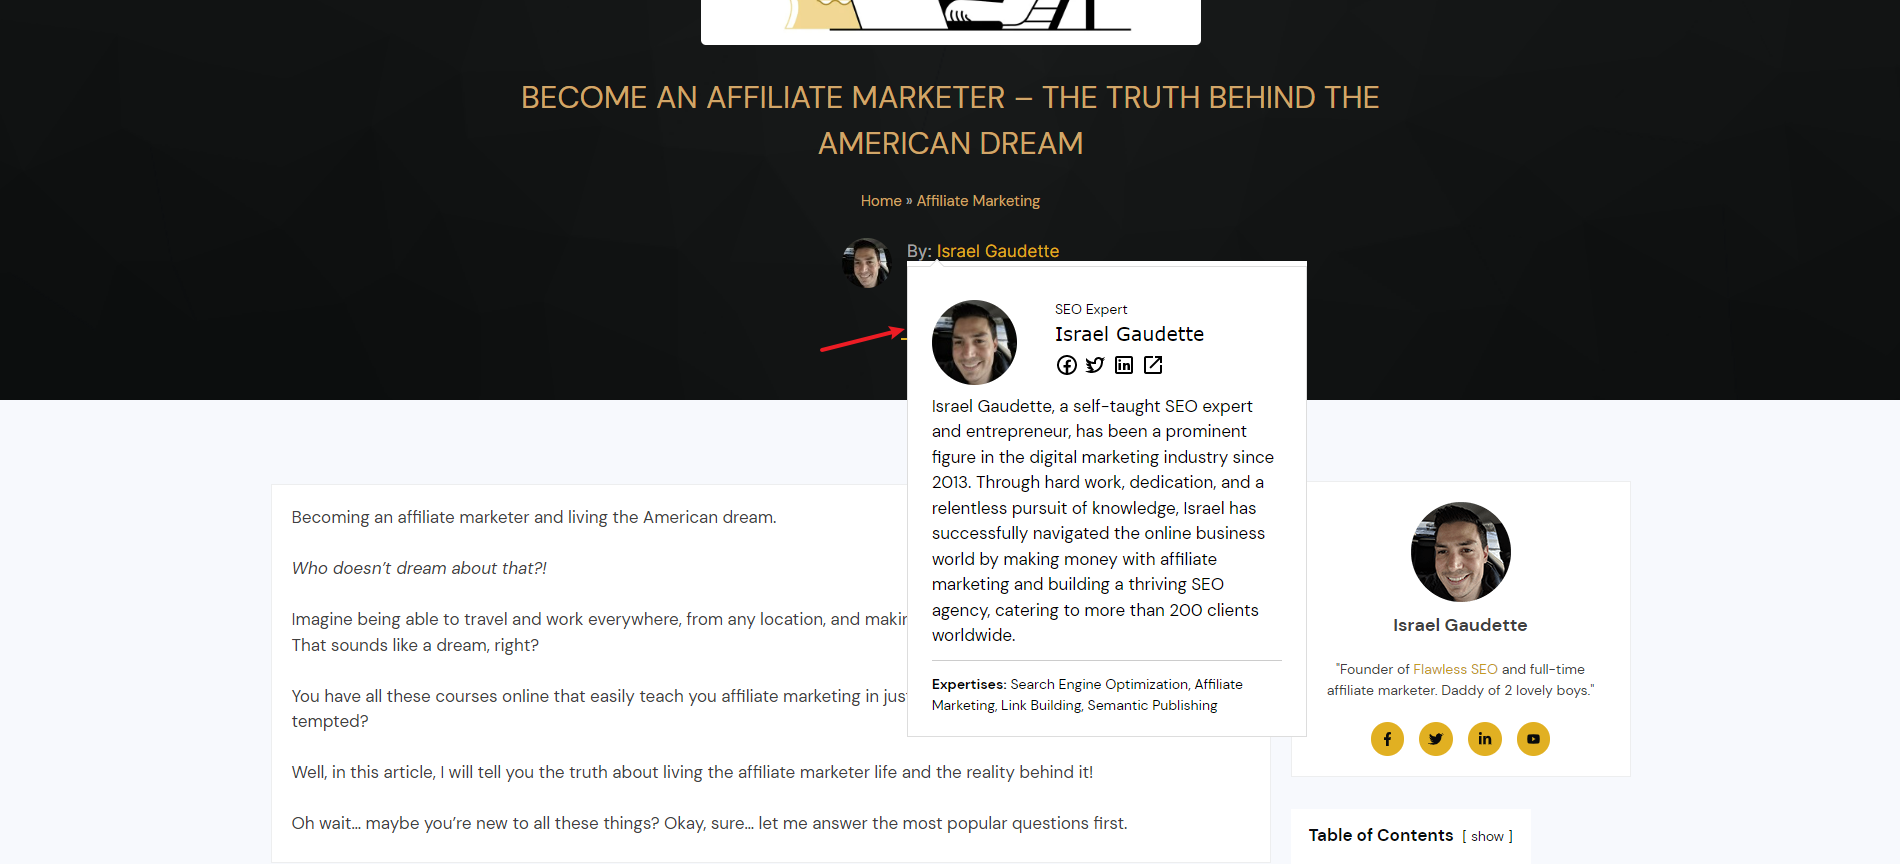
Bonus: Free Hover Author Box WordPress Plugin
Did you think you were done with me? You were wrong! I have a surprise for you 🙂 A custom author box plugin for WordPress, totally free for you!
That is important that you know that to be compliant with Google, the content you inject in your schema (ie: author description) must also be shown in your webpage content.
Of course, you can go with the traditional author box at the end of your article but I have a better way to be compliant without using this traditional method.
I’ve built a custom WordPress plugin that shows a nice author box on hover only 🙂 It’s more aesthetic and makes you compliant with Google!
You can download the plugin here. The installation is super easy, you just have to install the plugin and add a shortcode to your content template right under your dynamic author name field.
Attention: This plugin only works if you have applied the tutorial above to your site.
For GeneratePress sites, add the shortcode under the author name, in the post content template and add the CSS class authr-tltp to the container where the shortcode has been added (must be in the same container where the author meta is).

Note: This is important that the shortcode be added in the same container as the author, but also UNDER the author’s name. If you put the shortcode beside it, it won’t work. Don’t forget to assign the CSS to the container where the author’s name is.
Finally, here is the final result when you’ll over your author name.
Enjoy!